Archives / Search ›

Fonts and NX

For several years, I’ve been using a combination of Screen and NX as a detachable research environment. Since I started working on Jython and using Mercurial, I’ve been able to do more work on the Mac locally (especially with Eclipse, which isn’t fun in NX) then easily sync up to our Linux research machines when necessary for timing runs, or to use Pin or Simics. So while my need for NX has been reduced, I still need it several times a week.

I’ve very much had a love-hate relationship with NX. It works so much better than the alternatives such as VNC, RDP or using TRAMP with Emacs. But NX is also flaky and fragile, with bugs like insisting on a specific ordering of bit depths. NX forks OpenSSH and various X components, then fails to keep up to date with recent changes in each. Coordination between the various components is haphazard at best. The Mac NX client front end is still a PowerPC app compiled against an ancient version of Qt.

It’s hard to diagnose problems when NX fails by refusing to resume, losing, or worst of all, destroying your session. A multitude of log files exist—for the client, look in ~/.nx/temp—but require you distinguish expected brokenness from unexpected brokenness, only possible if you have a working setup to compare against.

Fonts are a particular sticking point. The NX developers really want client-side fonts to go away, but both of the X clients I tend to run in NX (rxvt and Emacs) use client-side fonts, so I don’t really have a choice. Some points to be aware of:

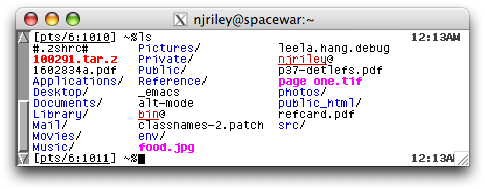
  • If an X client is using a font and it isn’t available to the local X server (NX client machine) when you try to resume a session, in the best case you’ll get a font like fixed substituted or see a bunch of boxes in place of your characters. In the worst case the session will be destroyed. Be careful.

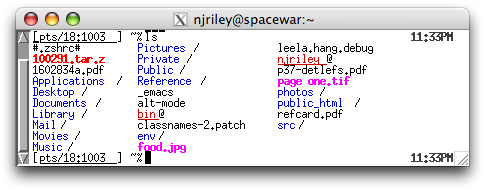
  • The documentation claims you must have the same set of fonts accessible on both the (NX) client and server, in order for them to be accessible and usable. Don’t forget to run mkfontdir—on OS X, this sometimes runs for you. However, sometimes a font can appear in xlsfonts because it used to be accessible; in this case it’ll either display a scaled bitmap or a substituted font.

  • At least on the Mac, there’s no guarantee that a font which appears in xlsfonts locally is actually available to NX. I don’t quite understand what’s going on here, but if you put your font in one of the default font directories (what’s displayed when you run xset fp default; xset q), run mkfontdir and xset fp rehash if necessary, then attach your NX session, it’s likely to work. On one of my Macs and user accounts, I can get it to work for custom font directories too, but I have no idea how to reproduce this.

The other major NX annoyance I run into is clients that either don’t start when they’re supposed to, or whose windows never appear when the session resumes. In the former case, sometimes the initial client I ask NX to run (a small rxvt) never starts, but the NX session is up, so I can start another rxvt if I notice before NX destroys the session from a lack of clients. In the latter case, the clients are there, so for example I can use emacsclient -e '(new-frame)' then C-x 5 1 to rescue my Emacs session and close all the unavailable frames. I haven’t found a more general fix for this one.

Random bonus for anyone who doesn’t follow my Twitter stream: ggplot2 is an amazingly well done plotting package. Having spent quality time with Jgraph, PyChart, matplotlib, Mathematica, Excel, Numbers, etc. I’ve never found one that did what I wanted as quickly. Highly recommended.

Restoring a hard drive from Time Machine

After replacing the drive in my iMac, next came a restoration from backup. Once again, this is covered pretty well elsewhere on the Web, but I’ve got a few comments about the process. Sorry about the lousy image quality; it’s late and I was too tired to mess with my camera.

I’ve got two backups on my drive; one of my iMac and one of my MacBook Pro. The restore utility identifies them both, but not in a particularly understandable fashion. Why does the MacBook Pro backup get a Time Machine icon and the iMac backup a FireWire disk icon? Why does the MacBook Pro’s machine name appear but not the iMac’s?

DSC_0713.jpg

Once I selected the first disk, for some reason it defaulted to showing me an ancient backup I didn’t even know I had, rather than the most recent backup available (why?)

DSC_0715.jpg

I never reinstalled Mac OS X, just renamed the disk after upgrading the iMac from TIger to Leopard, but that seems to be enough to throw off Time Machine.

DSC_0716.jpg

Ah yes, the day the hard drive died while I was far away in New York.

DSC_0717.jpg

The restore utility took quite a while to “calculate space required to restore data”. I’m not sure why it bothered—the backup drive is actually smaller than the new destination drive, and in any case, when calculation is complete, it doesn’t even display the results and proceeds to erase the destination disk.

DSC_0720.jpg

The time remaining indicator was wildly incorrect: after initially climbing over 8 hours, it didn’t take more than a couple of hours to perform the restore.

DSC_0723.jpg

Once the restore was complete and I rebooted into OS X, nearly everything was fine. The usual culprits (Mail caches, Spotlight, MobileMe syncing) were understandable, but I lost a few odd things like my input method configuration (Spell Catcher came up though I had it disabled) and Spaces keyboard shortcuts (not even the defaults were selected; I had no way of navigating Spaces until I reset them).

Replacing the hard drive in an aluminum iMac

I always buy AppleCare for my laptops—one exception being my Wall Street, an oversight which I soon regretted when the display cable and hinges failed shortly after the warranty expired. Desktops are a different matter—the worst non-drive-related failure I’ve ever had in an Apple desktop has been a blown FireWire port on my desktop G4, though I have luckily avoided some lemons such as the leaky liquid-cooled desktop G5s and iMac G5s with power supply problems. Though my iMac uses a lot of mobile parts, I didn’t think AppleCare was necessary.

While I was away for the holidays, my 24″ iMac (Mid 2007) crashed. This annoyed me a bit at the time, but since OS X’s stability is still not great, I fully expected to come home, hit the power button and have a working machine again.

This didn’t happen. The iMac simply displayed a plain white screen at startup. Pressing the power button while the iMac was in this state immediately turned the machine off. My first thought was what an idiot I was for not getting AppleCare.

Eventually, I discovered that holding down Option for a minute or two would usually bring up the Startup Manager. A couple of times I coaxed the hard drive into booting, which failed while loading boot caches. I was able to boot to a Mac OS X DVD, but Disk Utility hung when I tried to open it.

At this point, I was pretty sure that the drive in my iMac had died. The drive, a 500 GB Western Digital WD5000AAKS, came with the machine and was barely half full at the time, so I wouldn’t have replaced it otherwise. While I’ve dealt with several drive failures on my family’s machines recently, it’s the first drive I’ve had die personally since 2000, when a 12 GB IBM drive on my Wall Street gave up the ghost (and its replacement failed several weeks later when I was on vacation in Sweden, with a horribly loud noise I originally thought was something else).

Thankfully I’d been living on my MacBook Pro for a few weeks, so a dead iMac wasn’t a huge impediment; I moved the big black screen to the dining room table while I waited for a replacement drive to arrive.

In performing the replacement, I found two walkthroughs useful: this one on the MacRumors forums, and this one on AMFITEATAR (a Serbian site, though the walkthrough is in English). Both are thorough and well-illustrated, though not entirely consistent or correct. If you’re doing this yourself, you may find the following a helpful supplement:

I needed only TORX T6 (securing the LVDS connector) and T9 screwdrivers (everywhere else). The AMFITEATAR walkthrough mentions T4 as well, a size I didn’t have in any case.

Two suction cups with attached plastic hooks, placed at opposite corners, were quite adequate for removing the glass; no need for more than that, string, and so forth. (The exact ones I used were InterDesign 17600 “Clear PowerLock Suction Hook”; the 16600 looks similar.)

It’s really not necessary (and rather difficult in any case) to unplug the power connector from the LCD. If you watch the cable extension carefully as you lift the LCD, you can easily rotate it 90° and place it on top of the iMac while you replace the drive.

The MacRumors walkthrough doesn’t mention this, but the easiest way to remove the hard drive (after disconnecting the SATA data and power connectors, removing the thermistor and its taped-down cable) is with the plastic handle. This does require quite a bit of force; the AMFITEATAR site says to “push down”, which will likely not be down if you’ve got the iMac on its back; instead, push towards the base of the iMac, using the aluminum foot as a brace if needed. If you do choose to undo the two TORX screws which attach the drive to the plastic handle before removing it, be careful of the iSight. (It’s still better than the early TiBooks for which the official Apple instructions had you bend a piece of the frame in order to remove the drive…)

The circuit board on the bottom of the Seagate replacement drive I used (750 GB 7200.11) was too large to permit attachment of the thermistor in the same place as on the original WD drive. However, two indentations on the bottom of the Seagate drive were exactly the size of the thermistor clip Apple provided. Hoping this wasn’t a coincidence, I used one of them as an attachment point.

Quite a bit of dust ended up on the LCD while I was working. After reattaching the aluminum front bezel, I stood the iMac up, tilted it past vertical and squirted compressed air on the LCD to shake off the dust. The interior glass accumulated much less dust than the LCD over the same period and required hardly any cleaning.

When replacing the glass, the clear iSight area is useful for determining which end is up.

Good luck!

Repurposing the 3G iPod dock

Since I got a 2G iPod touch, my 30 GB 3G iPod—now on its third battery and with the hard drive replaced with a 4 GB CF card and adapter—has been sitting forlornly in its dock on the desk next to me.
DSC_0698.jpg

Tonight, I was removing the iPod and other unused bits of hardware from my desk when I noticed a replacement “10/15 GB” dock cover in the iPod dock’s box. It’s been so long since I bought it, I had completely forgotten the predecessor to today’s Universal Dock adapters. The cover is plastic, held on by four snaps. When removed, it reveals a metal and plastic frame.

DSC_0705.jpg

The dock that came with the 3G iPod is on the left; the standalone dock is on the right. While the covers are identical save a taped-on “30 GB” label, one looks quite a bit better “naked.”

DSC_0706.jpg

Having not bought a dock for my iPod touch yet, I tried placing it (in a Griffin Reflect case) in the naked 3G dock, and it fit perfectly side-to-side.

DSC_0707.jpg
DSC_0709.jpg

So, while my 3G iPod ambles off into retirement, its docks will see continued use.

NCIDpop 0.9.14

The OS X version of the NCIDpop network caller ID client, originally written by Alexei Kosut, has not seen much development in a while, and had fallen behind the Windows version. In August I added a call history window, network change robustness, localized date formatting and reverse lookup support. NCID’s maintainer has been pretty busy, but he’s now integrated the changes in the official release.

NCIDpop history

And if you’re wondering “why use NCID when I already have caller ID?” If you have SIP service (e.g., Vonage) at home, NCID gives you caller ID on the first ring on every computer display in the place. Since I get pretty frequent calls from people I don’t want to talk to, such as Spanish-speaking bill collectors who won’t take no for an answer, it’s been a great help in reducing my stress when the phone rings.